Whether you want to show off your photo prints in your own home or give some as a gift, our DIY photo holder ideas are perfect for displaying all your favourite moments. From creative photo frame decorations to simple origami holders, there will be an idea to suit every home and space. A great present to show you’ve been thinking about someone because a crafty gift for a loved one is always so much more thoughtful than just popping to the shops…
Not sure what photos to print? Our photography tips have lots of ideas for capturing everyday moments. And once you’ve taken your photos, you’ll want to make sure they look as good as possible, so have a browse of our photo editing apps blog that is full of advice for making your shots look as professional as possible.
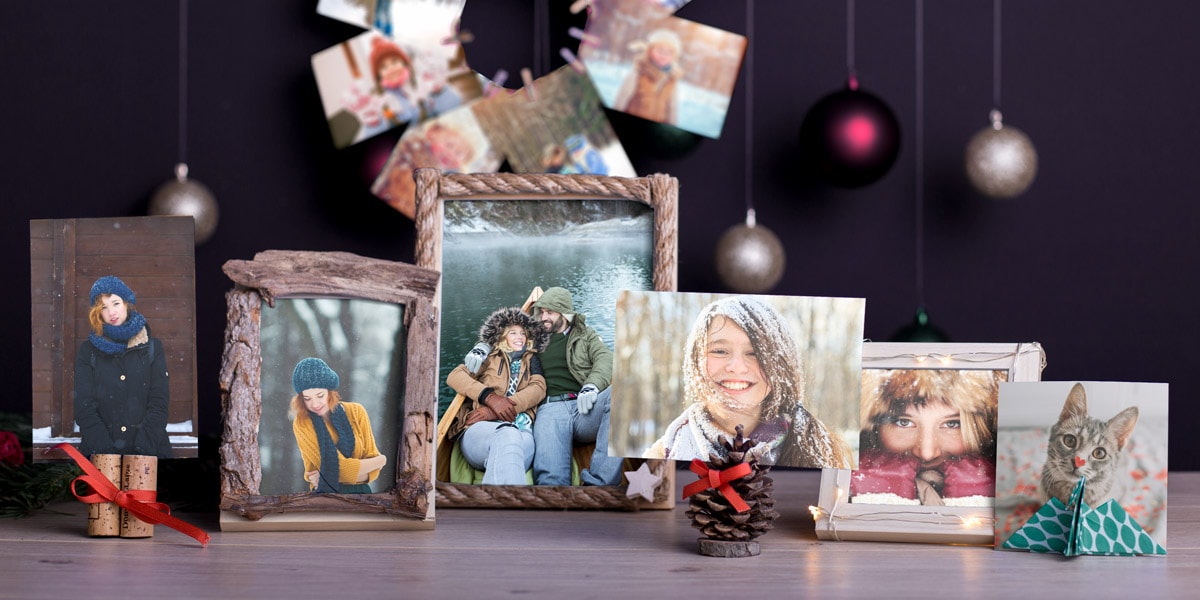
Rustic wood photo frame
Bring the outdoors inside with this easy photo frame. You can make a day of collecting the wood yourself at the local park and even take photos as you go! It will make a nice natural addition to your living space.

Time needed:
10 minutes
You will need:
Scrap wood, photo frame, glue gun, small hand saw

Step 1
Collect some scrap wood from the local park and make sure it is completely dry before using

Step 2
Use the glue gun to stick the wood to your photo frame

Nautical rope photo frame
Know someone who loves the sea? Then this rope frame is perfect for them. You can even add some little extras (like the star we’ve used) by glueing them to the rope. The nautical style frame is easy to create and will evoke memories of salty spray and boat trips. Use it to frame some beach photography.

Time needed:
15 minutes
You will need:
Rope, photo frame, glue gun, sharp knife

Step 1
Measure four lenghts of rope that fit the four sides of the frame and cut them off with a sharp knife

Step 2
Glue those four pieces to the frame using a glue gun

Double cork photo holder
Most houses have a few corks lying around so you may not even need to buy anything for this one. You can use any type of tie to attach the two corks. We chose ribbon but a short length of coloured string would also look nice.

Time needed:
5 minutes
You will need:
2 x corks, ribbon, small hand saw

Step 1
Use the ribbon to tie the two corks tightly together, securing them with a bow

Step 2
Create a small slit at the top using the hand saw and slip your photo in here”

DIY wreath photo holder
This crafty design allows you to display multiple photos at once. Why not print a series of photos from one special event like a wedding or birthday and group them all together to tell a story of the day.

Time needed:
20 minutes
You will need:
Cardboard, scissors, pegs

Step 1
Cut a circle out of the cardboard

Step 2
Attach the pegs to the wreath and use the pegs to attach your photos to the wreath
Sweet and simple origami photo holder
The Japanese art of origami perfectly compliments minimal decor. Choose coloured paper or a patterned sheet and get creative. We’ve made a crane but you can also make a folded householder or a little frame.

Time needed:
10 minutes
You will need:
1 x sheet of square paper

Step 1
Fold the paper into triangles, ensuring you create definite creases (this will make it easier later on)

Step 2
Follow the steps in the photos below until you reach the last step

Step 3
Stretch out the wings of the crane and slip your photo in

Seasonal pine cone photo holder
Perfect in winter or as a Christmas gift, this pine cone holder takes under 10 minutes but will make a big impact. You could even make a cluster of them and display them together on a table top.

Time needed:
10 minutes
You will need:
Pinecone, wooden stump, glue gun, small hand saw, ribbon

Step 1
Create a slit in the top of the pine cone with the hand saw

Step 2
Use the glue gun to stick the pine cone onto your wooden stump

Step 3
Glue the ribbon to the front and slide the photo in the slit a the top of the pine cone

Light up photo frame
We love this light up photo frame because it puts your moments centre stage. Fill it with a photo from a shared celebration and give it to your best friend. You could even add text to the photo and include a sweet message like ‘you light up my life’.

Time needed:
10 minutes
You will need:
Fairy lights, photo frame

Step 1
Wrap the fairy lights around the photo frame

Step 2
Use some scotch tape if you want to secure it at the back”
Feeling inspired? Then create some photo prints now. Choose the photo holder you’re going to make and decide on the size of your print. We have a number of formats including retro-style prints and enlargements. Once you’ve made your photo holder, take a photo of it and share it with us on Facebook or Instagram so we can see the finished piece.
Know a friend who is into arts and crafts? Share this blog with them using the buttons below.